This week, we introduce entity mode to the PostgreSQL sink. This feature enables indexers to insert and update stateful entities.
For example, let's consider an onchain game with the following events:
GameStarted(game_id)
: emitted when a game is started.GameEnded(game_id, score)
: emitted when the game finishes.The following indexer inserts a new "STARTED"
game when the first event is
emitted, and updates the game status when GameEnded
is emitted.
export default function transform({ header, events }) { const { timestamp } = header; return events.flatMap(({ event }) => { if (isGameStarted(event)) { const { game_id } = decodeEvent(event); return { insert: { game_id, status: "STARTED", created_at: timestamp, }, }; } else if (isGameEnded(event)) { const { game_id, score } = decodeEvent(event); return { entity: { game_id, }, update: { score, status: "ENDED", updated_at: timestamp, }, }; } else { return []; } });}
This first release should be considered a preview and we're still collecting feedback on entity mode. You can open an issue on GitHub to tell us what you think about it.
It's now possible to have multiple indexers write data to the same MongoDB collection! This enables multiple indexers to run in parallel, increasing indexing speed.
You can specify additional conditions that will be used when invalidating data
with the invalidate
option. Use this to restrict which documents are affected
by an indexer.
export const config = { // ... sinkType: "mongo", sinkOptions: { database: "example", collectionName: "transfers", // Make sure to also add these properties to the documents // returned by the transform function. invalidate: { network: "starknet-goerli", symbol: "ETH", }, },};
We are now adding support for one indexer inserting data into multiple MongoDB collections.
We switched the allocator used by all the Apibara binaries to jemalloc. From our experience in production, we have seen DNA instances dropping from 20Gb of memory used down to 500Mb 🤯!
Previously, users could specify which environment variables were available to
the indexer's script by using the --allow-env
flag and pointing it to a .env
file.
We updated all sinks to allow indexers to inherit and access the current
environment. Users can use the --allow-env-from-env
flag to specify which
variables the indexer has access to. This feature is especially useful to users
running indexers in production, since they can use their platform (e.g. Docker
or Kubernetes) to set environment variables.
This week, we introduce three changes that significantly speed up data-heavy indexers.
The first change adds the option to control what event data the server sends. By default, the DNA protocol attaches additional data to each event delivered over the stream. This data includes the transaction that emitted the event, together with its receipt. If the same transaction emits multiple events, this data is included multiple times. Additionally, most indexers only need some of the additional data in the transaction's receipt, which leads the DNA streams to deliver much more data than is necessary. In this release, indexers can request the server not to send events' transactions and/or receipts. This reduces the amount of data sent to the client by 2 to 10 times less, which means the client has less data to read and parse, resulting in much better performance. Update your event filters as follows to take advantage of this new feature.
For users using the PostgreSQL integration, it's now possible to have multiple
indexers synch data to the same table. If your application requires indexing
similar but unrelated data (for example, Transfer
events for different ERC20
tokens), you can run multiple indexers in parallel to speed up indexing.
Previously, having multiple indexers write data to the same table resulted in
data loss in case of chain reorganizations (the last indexer to handle the reorg
would delete the data of all other indexers). This release adds a new
configuration option to add additional column constraints to invalidate queries.
Parallel indexing will soon come to the MongoDB integration as well.
Finally, this release includes a new version of the Deno runtime. We changed how
data is exchanged between the sink (implemented in Rust) and your script
(implemented in Javascript) by taking advantage of the new #[op2]
extension
macro.
This week, we worked on improving the developer experience using Apibara from the command line. The Apibara CLI and Sinks' latest release comes with improved error messages.
For example, trying to execute the apibara run
command with non-existing files
results in the following error message. This message provides enough context to
help you debug the error. If you feel stuck, you can always post the error in
our Discord, and we will do our best to help you.
$ apibara run path/to/indexer.ts# Error: cli operation failed# ├╴at cli/src/run.rs:36:64# │# ╰─▶ failed to load script# ├╴at sinks/sink-common/src/cli.rs:34:14# ╰╴script file not found: path/to/indexer.ts
The CLI will warn you if the indexer doesn't export the config or transform function or if any key was misspelt.
$ apibara run indexer.js# sink configuration error# ├╴at /tmp/nix-build-apibara-0.0.0.drv-0/source/sinks/sink-common/src/lib.rs:75:10# ├╴invalid sink options# │# ╰─▶ webhook sink operation failed# ├╴at sinks/sink-webhook/src/configuration.rs:49:14# ╰╴missing target url
One challenge when running Apibara integrations in production is figuring out if
the indexer exited because of a configuration error or because of a transient
error. This is important to decide whether to restart the indexer or not. This
release helps operators by returning a different Unix exit code based on the
error type. These follow the codes defined in the sysexit.h
header.
0
: the indexer was interrupted and exited successfully.78
: configuration error. The indexer should not be restarted.75
: temporary error. The indexer should be restarted after a back-off period.error-stack
crateWe improved error handling by changing how we manage errors in the Apibara
source code. Before this release, Apibara implemented errors following Rust best
practices with libraries exporting one or more error types implemented using
thiserror
and applications using eyre
. This approach worked well initially,
but thiserror encourages reusing the same variant for errors of the same type
(e.g. MyError::Io(std::io::Error)
for io errors). Any context of what
operation caused the error is lost, resulting in error messages not helping
users fix their bugs.
Error-stack approach is a hybrid between thiserror and eyre (or anyhow). Like thiserror, libraries and applications should define their error type. This can be anything. In Apibara, we use both structs and enums. Like eyre, it's possible to attach additional context to errors to provide more information to end users.
pub fn load_script(path: &str, options: ScriptOptions) -> Result<Script, LoadScriptError> { let Ok(_) = fs::metadata(path) else { return Err(LoadScriptError) .attach_printable_lazy(|| format!("script file not found: {path:?}") ); }; let current_dir = std::env::current_dir() .change_context(LoadScriptError) .attach_printable("failed to get current directory")?; let script = Script::from_file(path, current_dir, options) .change_context(LoadScriptError) .attach_printable_lazy(|| format!("failed to load script at path: {path:?}") )?; Ok(script)}
This change is only the first step in a better developer experience. You should expect more improvements in the following weeks and months.
This week, we released an update to the Apibara CLI tool. This version fixes a bug causing the API key used to stream data to leak in some situations.
To update, reinstall the CLI tool with:
curl -sL https://install.apibara.com | bash
We added a new section to the documentation showing how Apibara ships with the
best tool to test indexers. The apibara test
command implements snapshot testing for indexers. The tool snaps the indexer's
output on the first run. The indexer's output is compared with the previous
snapshot on successive runs. The CLI tool also helps create test fixtures by
connecting to an actual DNA stream and downloading data locally.
Apibara has been used in production for over one year, and it's now time to get our users more involved in the design process of the DNA protocol and CLI tool. For this reason, we adopted a RFC process to guide the evolution of Apibara.
You can find all RFCs on the Notion page. If you see anything that catches your eye, please leave a comment!
We are excited to release the new Apibara Operator for Kubernetes! This release make it even easier to run Apibara indexers on demand on your self-hosted infrastructure.
A Kubernetes operator is a service you deploy on your cluster to manage Custom Resources (CR), usually defined by a Custom Resource Definition (CRD). This service listen for changes to CR and reconciles the cluster's state with the target state defined by the developer. The operator takes care of the low-level operational details such as scheduling a Pod to run the indexer or restarting the container if it exits because of a transient error.
In practice, here's how to use the Apibara Operator in your cluster.
Start by generating the Apibara CRDs with apibara-operator generate-crd | kubectl apply -f
. This will install a new Indexer
CRD.
Next you need to run the operator in your cluster. The operator is stateless so you can run it as a deployment. In the future, we will provide an Helm Chart to install the operator in one command.
Now you can run an indexer by pointing to the source code (either clone a GitHub repo or from a mounted volume) and configuring the indexer with environment variables.
Notice: for a real-world production deployment, you should persist the indexer state to an ETCD cluster.
The operator is a step forward in simplifying running Apibara indexers. Next week we will release the new "Runner" API abstraction to provide one API to run Apibara indexers independently of the target platform (for example, locally, Kubernetes, or AWS).
This week we added a new quota service to DNA. This service is used to globally limit how much data a specific client is allowed to use.
The quota service is a simple gRPC service with two methods:
check
: check if the client can stream data. This method is called once
before the client starts streaming data.updateAndCheck
: this method is periodically called by the DNA service while
the client is streaming. It's used to update the amount of data consumed by
the user and to, at the same time, check if the client can keep streaming
data.The DNA service extracts the team and clients ids from the request metadata (gRPC headers), this gives teams a high degree of control over their quota logic.
Testing should help developers move faster and not break things. When building indexers, that often feels different. That's why we decided to add a built-in tool to Apibara to quickly test your indexers.
If you want to start testing your indexers, update the Apibara CLI to the latest version with:
curl -sL https://install.apibara.com | bash
The new apibara test
command implements snapshot testing for Apibara indexers.
The first time you run a test, it will fetch actual data from a DNA stream and
run your indexer on this data, storing all relevant data (configuration, input
stream, and output data) to a snapshot file. You can inspect this file with any
text editor and check that the output matches your expectations (pro tip: you
can manually edit the result to your liking). Now, you can rerun the test
command, and it will replay the stream data from the snapshot file and compare
the output of the indexer with what is stored in the snapshot. If the output
matches, the test is considered a success. If it fails, the CLI will print an
error message showing a difference between the expected and actual results.
The test command provides some options to customize the input stream by
specifying a specific block range for replaying data, among other
customizations. You can also decide to overwrite an existing snapshot file. We
will publish a more detailed testing tutorial in the upcoming days. You can read
more by running apibara test --help
.
This week, we released an update to all Apibara integrations. This update improves the integrations by exposing a new gRPC service to query the indexing status and progress.
Upgrading is easy. Check what integrations you have installed with
apibara plugins list# NAME KIND VERSION## mongo sink 0.3.0# postgres sink 0.3.0# console sink 0.3.0# parquet sink 0.3.0
Then, upgrade the plugins with the following:
apibara plugin install sink-webhook
Every time you run an indexer, the status server will automatically start in the background. The server binds to a random port to allow you to run multiple indexers simultaneously, so look for the following message to find out how to reach your server.
INFO apibara_sink_common::status: status server listening on 0.0.0.0:8118
Alternatively, specify an address and port with the --status-server-address
flag, for example --status-server-address=0.0.0.0:8118
.
While the indexer is running, query its state using a gRPC client. In this example, we use grpcurl to query it from the command line. The gRPC service definition is available on GitHub (don't forget to star and subscribe while you're there) so you can generate a client in your favourite language!
# The status server supports reflection!$ grpcurl -plaintext localhost:8118 list# apibara.sink.v1.Status# grpc.reflection.v1alpha.ServerReflection# The only method exposed is `GetStatus`$ grpcurl -plaintext localhost:8118 list apibara.sink.v1.Status# apibara.sink.v1.Status.GetStatus# Call this method to get the current status$ grpcurl -plaintext localhost:8118 apibara.sink.v1.Status.GetStatus# {# "status": "SINK_STATUS_RUNNING",# "startingBlock": "3129",# "currentBlock": "4248",# "headBlock": "241673"# }
This API is the last piece needed before working on the new runner abstraction. The runner API enables developers to start, stop and query indexers through a single API. It's like docker-compose but for indexers.
This week, we released version 0.3.0 of the PostgreSQL integration. This version supports secure TLS connections between the indexer and the database. You can synchronize onchain data to hosted PostgreSQL, such as Amazon RDS, Google CloudSQL, Supabase, and Neon.
We updated the @apibara/indexer
package with minor fixes to transaction types.
Users should update to the latest release for better type-checking and
autocomplete support.
This week, we released version 1.1.2 of the Starknet DNA service. This version
brings a new Status
gRPC method to query the ingestion state of the DNA
server. This endpoint can be used to know the most recent block in the chain and
the latest ingested block by the node.
Users running their Starknet DNA server are encouraged to upgrade their
container images to quay.io/apibara/starnet:1.1.2
.
@apibara/indexer
Typescript package releaseWe released an update to the indexer Typescript library. This version fixes some
typing issues, especially for Starknet's Filter
and Block
types. Users can
upgrade by changing their imports to point to the new release.
import { Filter } from "https://esm.sh/@apibara/indexer/starknet@0.2.0";
This week, we are launching a new entity mode for the MongoDB integration. This new mode gives you even more power by enabling you to insert and update existing entities that you previously inserted in Mongo.
Before you can try out entity mode, you need to update the MongoDB integration:
apibara plugins install sink-mongo
To enable entity mode, set the entityMode
option to true
. You must then
change your transform function to return a list of entity operations. These
operations are JSON objects that contain an entity
property that specifies
which entities need update and an update
property with a Mongo update
operation or
Mongo
pipeline
on that entity.
For example, the following update operation updates the owner of an NFT token and, at the same time, increases the transaction count on the same token.
You can read more about entity mode, including details about its implementation, in our documentation. Looking forward to seeing what you're going to build with it!
In this tutorial, we are going to show how to easily index NFT Metadata by leveraging a serverless job queue like Inngest.
Implementing a robust and scalable NFT metadata indexer is hard, your indexer needs to take the following into consideration:
Luckily, all of the issues above are solved by using modern developers tools like Apibara and Inngest.
Apibara is an open-source platform to build indexers. Our philosophy is to focus on streaming and transforming data and then sending the result to third-party integrations. In this case, we use Apibara to trigger jobs in a task queue.
Inngest is a serverless task queue: you start by implementing durable tasks using Javascript or Typescript. Durable tasks are functions composed by one or more steps (for example, fetch the token URL, or fetch metadata). Inngest will run each step in order, automatically retrying a step if it fails. With Inngest, you can implement complex workflows without having to worry about scheduling or retries.
In the next sections, you will learn how to:
Before we begin, you should visit the getting started guide to learn how to install and configure Apibara.
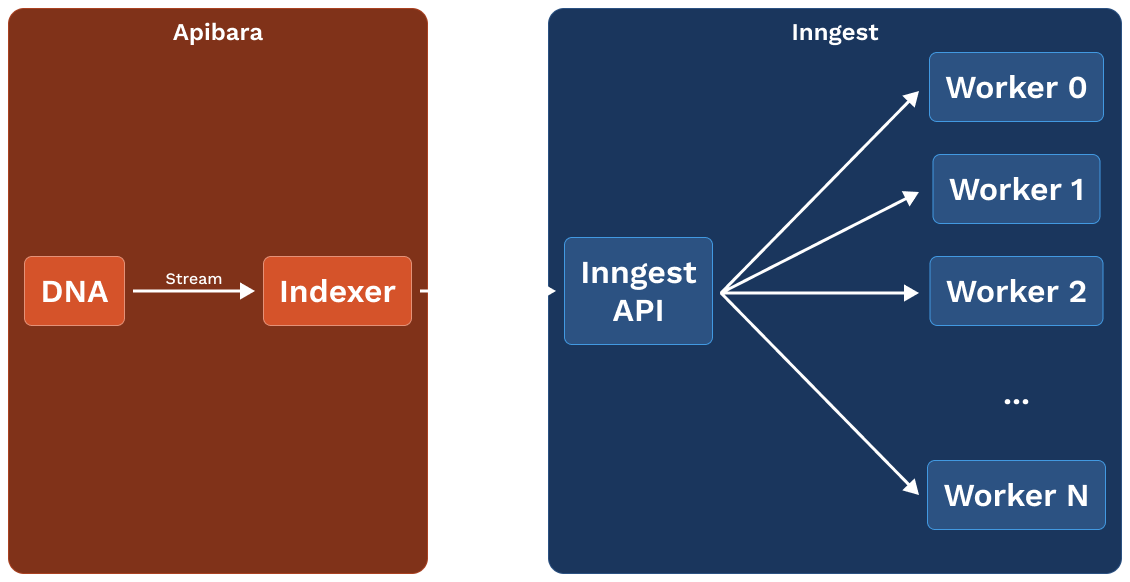
The image below contains the reference architecture of what we are going to build in this tutorial:
As always, the source code for this tutorial is available on GitHub.
For this tutorial, we are going to use Deno as the Javascript runtime. Refer to this guide to setup Deno on your machine. Note that you can follow along this tutorial using Node.js if you prefer that.
We start by creating a src/inngest
folder to contain all Inngest-related code.
We create a file src/inngest/client.ts
that contains the definition for our
Inngest client. It contains the schema for the events that will trigger our
tasks and the Inngest client. Notice that since we are running Inngest locally,
we use the "local"
eventKey
.
The next step is to create a file containing the definition of the task we want
to run. We do that in src/inngest/fetch_metadata.ts
. You can learn more about
writing Inngest functions in the official
documentation.
The last step is to create the HTTP server that we will use later to start new
tasks. In this case we use express, but you can integrate with other frameworks
such as Next.js. We implement the server in src/server.ts
:
We are now ready to start the Inngest server. From the root of your project, run
deno run --allow-all src/server.ts
to start the express server. In another
terminal, start the Inngest UI with npx inngest-cli@latest dev -u http://localhost:8000/api/inngest
and then visit http://127.0.0.1:8288.
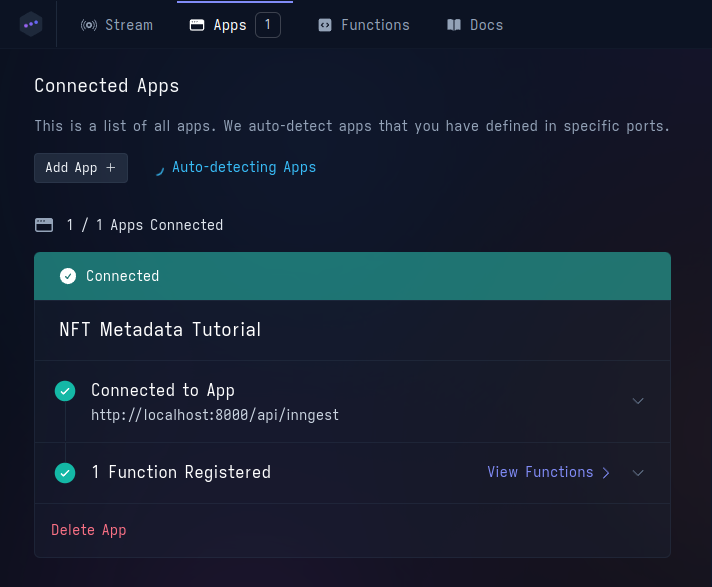
If you navigate to the "Apps" section, you should see the application we defined
in src/inngest/client.ts
.
We are now ready to invoke Inngest functions using Apibara.
We are going to write an Apibara indexer to invoke Inngest functions. Inngest
provides an HTTP endpoint where we can send events (like the nft/mint
we defined)
to start the function to fetch metadata we defined previously.
We are going to use the Webhook integration to invoke this endpoint for each
NFT minted.
For this tutorial, we are going to use the "Argent: Xplorer" collection as an example, but you can use the same strategy on any NFT collection.
We are going to create a src/indexer.ts
file. This file contains the indexer
configuration and a transform function (more on this later).
We configure the indexer to receive Transfer
events from the 0x01b2...3066
smart contract, starting at block 54 900 (when the contract was deployed).
Finally, we configure the sink. In this case we want to use the webhook sink
to send the data returned by the transform function to the HTTP endpoint
specified in the configuration. We turn on the raw
option to send data to the
endpoint exactly as it's returned by the transform function.
As we mentioned early, Apibara uses the transform function exported by the script to transform each Starknet block into a piece of data that is specific to your application. In this case, we want to perform the following:
Note that we can schedule multiple tasks by sending a list of event payloads.
Add the following code at the end of src/indexer.ts
. Since an Apibara indexer
is just regular Typescript, you can continue using any library you already use
and share code with your frontend.
Now you can run the indexer with apibara run src/indexer.ts -A <dna-token>
,
where <dna-token>
is your Apibara DNA authentication token (you can create one
in the Apibara dashboard). You will see your indexer going through Starknet
events block by block and pushing new tasks to Inngest.
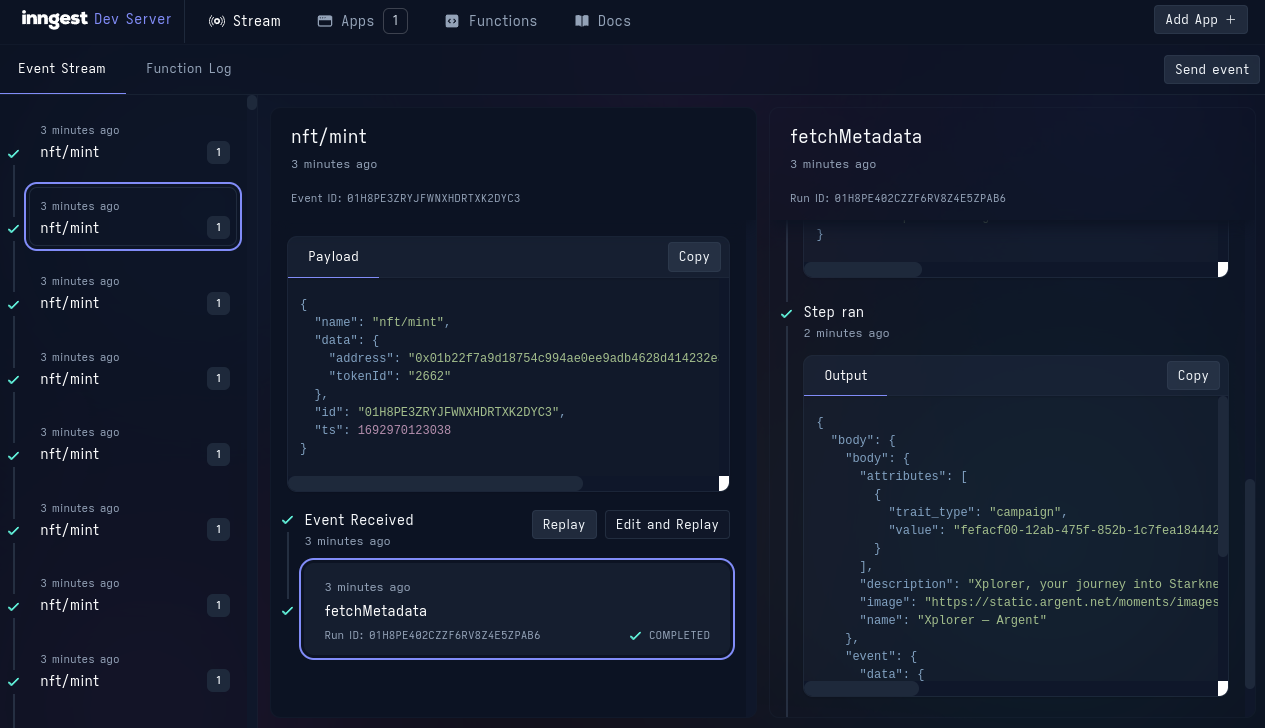
You can see all function invocations in the Inngest UI. Select one event to see the function steps in real-time, together with their return values.
This tutorial showed how to get started integrating Inngest with Apibara. If you want to take this tutorial further and use it for your project, you can explore the following possibilities:
You can now write type-safe indexers using the new Typescript SDK! Use it by
importing the @apibara/indexer
package from your favourite CDN (like
esm.sh or Skypack) and then
adding types to your variables and functions.
We updated the integrations based on your feedback. You can update using the apibara CLI.
Start by listing all the integrations you installed:
apibara plugins list# NAME KIND VERSION# mongo sink 0.1.0# postgres sink 0.1.0# webhook sink 0.1.0# console sink 0.1.0# parquet sink 0.1.0
Then update them one by one:
apibara plugin install sink-console
Check that the upgrade was successful.
apibara plugins list# NAME KIND VERSION# mongo sink 0.2.0# postgres sink 0.2.0# webhook sink 0.2.0# console sink 0.2.0# parquet sink 0.2.0
Changes to the indexer transform function
We changed the indexer’s transform function to accept a single block at the time. Previously this function was invoked with an entire batch of data. Talking with early adopters, we realised this behaviour is confusing, so now the function accepts a block at a time.
Upgrading your indexers is easy; change your transform function as follows:
diff --git a/script.ts b/script.tsindex 999ba82..ea9667a 100644--- a/old.ts+++ b/new.ts@@ -1,8 +1,5 @@-export default function transform(batch: Block[]) {- return batch.flatMap(transformBlock);-}--function transformBlock(block: Block) {+export default function transform(block: Block) { // transform a single block return block; }
Disk persistence for development
Before this release, developers had only two options for persisting the indexer state between restarts:
This release adds a third option:
--persist-to-fs=<dir>
option.We fixed a bug installing the CLI tool on MacOS.
We updated the Starknet DNA Service to work better with nodes implementing the Starknet JSON-RPC Spec v0.4. Here’s how to upgrade if you’re running a Starknet DNA service:
http://<pathfinder0ip>/rpc/v0.4
)apibara/starknet
Docker image to v1.1.1We are excited to release the first iteration of the Apibara command line tool. This tool is the first step in overhauling the Apibara developer experience to reduce the time needed to build production-grade indexers. This tool enables developers to easily synchronize onchain data with any offchain service they use: from databases like PostgreSQL and MongoDB to any service that accepts webhooks.
Over the past year, we worked with dozens of teams to understand how they consume onchain data and build applications. We learned that all projects are different, so we wanted a tool that enables them to keep using the tools they already know and love.
The new indexers are built on top of the DNA streams and provide a higher-level developer experience for building indexers.
The new CLI is the main entry point to Apibara: use it to run indexers and manage integrations. Installation is as simple as:
curl -sL https://install.apibara.com | bash
Indexers are implemented in Javascript or Typescript. Apibara embeds a Deno runtime to execute the code users provide on each batch of data it receives in the stream. Thanks to Deno, the indexer scripts are self-contained, and you can run them in a single command. Apibara doesn’t require you to manage half a dozen configuration files.
For example, the following code is enough to index all ERC-20 transfers to a PostgreSQL database. Apibara takes care of all the low-level details such as chain reorganizations.
After data is streamed and transformed, it’s sent to the downstream integration. As of today, Apibara ships with 4 integrations:
This is just the first step in a new journey for Apibara. Over the following weeks, we will launch the following products:
Head over to the getting started page to learn how to setup and run your first indexer in less than 10 minutes.
Apibara is the fastest platform to build production-grade indexers that connect onchain data to web2 services.
Resources